Immediately after the First Friday of my "Collaborations in Junk" show was a local Craftacular event. I heard about it shortly before and I thought, what the heck- maybe they have some openings. So I called up and sure enough, they did! So, I had to take more time off work, but I had all the art done. Plus display items hanging around to boot. It ended up being a really good idea. I met some nice people, made more sales and lined up some things for the new year. I hope I can get in on that thing again next year. :)
Here's what my booth looked like:
Showing posts with label Crafty. Show all posts
Tuesday, November 15, 2011
Thursday, October 27, 2011
Getting Ready for "Collaborations in Junk"
So I decided to have an art show in November to take advantage of the holiday season. I haven't had an art show in quite awhile—never one where I embraced my artsy crafty crossover to this extent. So I started a few months ago by collecting rusty scrap metal (via a special fella I know) and visiting my dad for father/daughter welding time- you know, like everyone does.
I knew that I wanted to do up some junk metal holiday trees, so I got to work on those right away. Here's some evidence of the process.
Then I decided to change it up and consider a show of more repurposed materials and I thought of using old toys as decor. (hot glue, fabric strips and styrofoam ring as base)
Then I got some inspiration about reusing croquet sets in a new way and put my head together with my dad again to come up with a neat idea there- folder holders.
Why not revisit the U.S. fabric map project? (See previous post on that one) Working on that. Sketches. Yes. Put fabric in that, too. Sure!
I've been wanting to use jar lids to make a hurricane candle holder for a few years now- I'm gonna do it! (used phillips and flat head screwdrivers and an awl to make the holes, layered stencils and spraypaint for outside decoration)
And hey- let's do a lamp!
So anyway, that's the idea. I've been making a bunch of stuff and I'm having a show. Shortly after November 4 things will be up on Etsy at melagerie.etsy.com.
I knew that I wanted to do up some junk metal holiday trees, so I got to work on those right away. Here's some evidence of the process.
![]() |
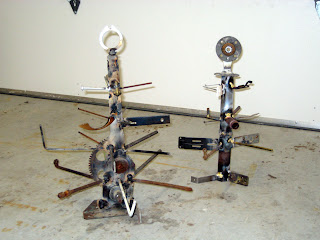
| Dad welding something or another |
![]() |
| Pre-paint |
![]() |
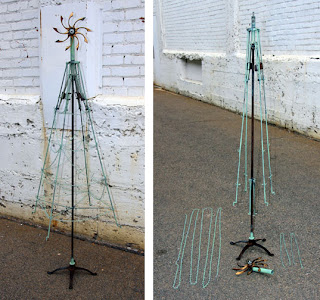
| This sucker comes apart/collapses for shipping or storage! |
Then I decided to change it up and consider a show of more repurposed materials and I thought of using old toys as decor. (hot glue, fabric strips and styrofoam ring as base)
![]() |
| Ok, so I had to supplement with a couple of store-bought bags, but most was old. All was crappy. |
Then I got some inspiration about reusing croquet sets in a new way and put my head together with my dad again to come up with a neat idea there- folder holders.
![]() |
Why not revisit the U.S. fabric map project? (See previous post on that one) Working on that. Sketches. Yes. Put fabric in that, too. Sure!
![]() |
I've been wanting to use jar lids to make a hurricane candle holder for a few years now- I'm gonna do it! (used phillips and flat head screwdrivers and an awl to make the holes, layered stencils and spraypaint for outside decoration)
![]() |
| Bottom dish and candle yet to be added |
And hey- let's do a lamp!
![]() |
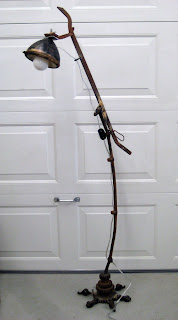
| Bulb reconsidered. Otherwise, this is probably the coolest thing in the universe. |
So anyway, that's the idea. I've been making a bunch of stuff and I'm having a show. Shortly after November 4 things will be up on Etsy at melagerie.etsy.com.
Wednesday, March 30, 2011
Kidtastic Paper Garden
Babysitting jobs are always pretty exciting for me- perfect opportunity for crafting with kids. My friend Nikki was also gonna be there, so hey, this would be pie, right? Well, getting them on board with my idea of a paper garden was a little difficult- there were forts to be made. But, I just started making flowers and bugs and they came around ;) So here's how it came out:
![]() |
| Working hard! |
![]() |
| It's a grass-making sweat shop, I tells yah! (Not really. No child was harmed or even bored :) |
![]() |
| Check out that bug! |
![]() |
| Puffy smiles! |
![]() |
| Finished product! |
Wednesday, March 2, 2011
Birthday Bonanza
Celebrating a birthday means making favorite food for the birthday boy or girl. For me, that meant making German chocolate cake, my mom's recipe, and key lime pie, my own recipe/something I found years ago online. To top it all off, I made little ribbon flags on skewers that I shoved into the cake at the last possible moment like you would candles. Blowing on those does not have the same effect as blowing out flaming candles and it left me feeling a little lackluster---until I got to pass out the flags with pieces of cake. Wee!
I should have you know that I did get carried away with the flags. I couldn't stop myself. It looked better on the table- more of a centerpiece- take a look.
I'll go ahead and share the key lime pie recipe. It's pretty short and sweet.
Key Lime Pie
INGREDIENTS:
Crust:
MAKE IT UP
SERVES
8
I should have you know that I did get carried away with the flags. I couldn't stop myself. It looked better on the table- more of a centerpiece- take a look.
I'll go ahead and share the key lime pie recipe. It's pretty short and sweet.
Key Lime Pie
INGREDIENTS:
Crust:
- Go out and buy a graham cracker crust from the store. Don't be a snob.
- 4 large or extra large egg yolks
- 1/2 cup fresh key lime juice (12 key limes or 2-3 regular limes)
- 2 teaspoons grated lime peel, green portion only
- whipped cream for garnish
MAKE IT UP
- Use an electric mixer and beat the egg yolks until they are thick and turn to a light yellow, but don't over mix.
- Turn the mixer off and add the sweetened condensed milk. Turn speed to low and mix in half of the lime juice. One the juice is incorporated add the other half of the juice and the zest, continue to mix until blended (just a few seconds).
- Pour the mixture into the pie shell and back at 350 for 12 minutes to set the yolks and kill any salmonella in the eggs.
SERVES
8
Monday, February 14, 2011
Valentine's Card Party
I found some valentine's that were given to and given by my older brother when he was a tot. I scanned them up, printed them out and bedazzled them. Why mess too much with a good thing? I had the design girls over to do some of their own handiwork as we enjoyed some snacks. They ended up with things apparently too cool for me to photograph-anyway, enjoy looking over their shoulders as they work.
![]() |
| (Check out the bunny bow tie) |
Tuesday, February 1, 2011
Xmas 2010
Holidays get me into the crafty mood. This last Xmas I made a wreath, a stick tree and ornaments with some crafty kids in my extended family. A goal of mine in 2011 is to do more crafty activities with kids—maybe even in an official volunteer capacity.
The wreath—made with old glass ornaments I picked up on the cheap at thrift stores, a styrofoam ring and xmas greenery candle ring that I cut apart. With a little hot glue and I was good to go. (I used a vintage filter on my camera phone, that's why the coloring is so fun, ha ha.)
The stick tree was really a black stick tree from Halloween decorations in the fall. I repainted it a soft blue-green and decorated it with antique pastel glass ornaments and glass birds. I anchored it in an old glass jar with rocks in the bottom and some battery powered lights. I think it turned out pretty swell.
Crafty kids: We made ornaments for the tree out of flat styrofoam cutouts. I had scrapbooking papers that they traced and glued to the forms. Then they added shaped confetti, glitter glue (bad idea for travel!) and fuzzy pipe cleaner hooks.
The wreath—made with old glass ornaments I picked up on the cheap at thrift stores, a styrofoam ring and xmas greenery candle ring that I cut apart. With a little hot glue and I was good to go. (I used a vintage filter on my camera phone, that's why the coloring is so fun, ha ha.)
The stick tree was really a black stick tree from Halloween decorations in the fall. I repainted it a soft blue-green and decorated it with antique pastel glass ornaments and glass birds. I anchored it in an old glass jar with rocks in the bottom and some battery powered lights. I think it turned out pretty swell.
I have to share an older creation that I made with my dad. It's a welded metal tree made from scraps my dad had laying around his shop-ex: a bottle opener as one branch. I've got the images here of it all dolled-up. I hope to make some smaller versions in March with him in his new shop. I've already sold a couple of medium-sized trees through my etsy shop: melagerie.etsy.com.
Crafty kids: We made ornaments for the tree out of flat styrofoam cutouts. I had scrapbooking papers that they traced and glued to the forms. Then they added shaped confetti, glitter glue (bad idea for travel!) and fuzzy pipe cleaner hooks.
Subscribe to:
Posts (Atom)


